Standard
Remote notifications allow your application to receive messages from Actito in real time, even when the app is not active. To enable this functionality, include the ActitoPushKit dependency. This module provides all the components necessary to register the push subscription and handle incoming notifications. You may implement a custom user interface to present notifications. However, we recommend including the ActitoPushUIKit module to take advantage of the managed notification UI, which simplifies implementation and ensures a consistent user experience.
Before getting started with this module, ensure that the following steps have been completed:
- You have successfully completed the Getting Started guide and included the
ActitoPushKitdependency - You have set up APNS authentication key for your application
Notification provider environments
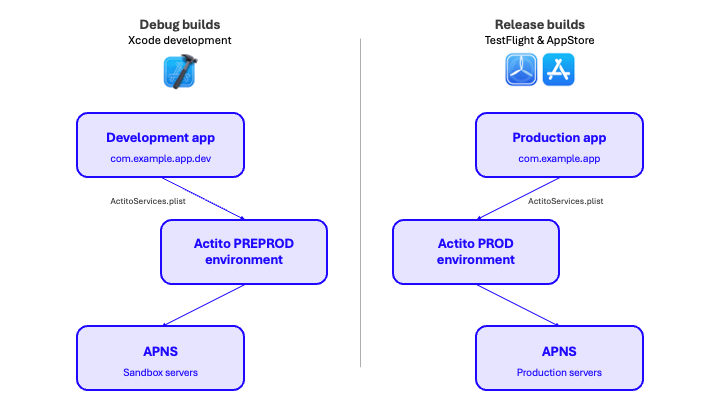
As described in the Environments section of the Getting Started guide, maintaining separate environments for development and production is essential. This separation becomes even more critical when implementing remote notifications.
Each environment should use its own Actito Services configuration to ensure consistent and isolated registration of push subscriptions. For example, development builds should receive notifications only from the development environment, while production builds communicate exclusively with the production environment. This approach ensures data consistency and a clean testing process.
Enabling remote notifications
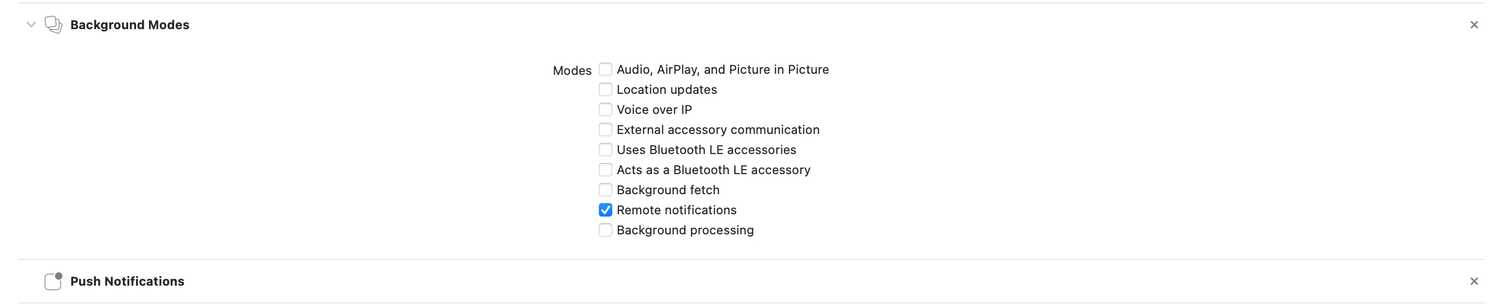
First, add push notifications capabilities in your project. Go to your app's target, click in the tab Capabilities and add both Push Notifications and Background Modes/Remote Notifications as shown below.
The SDK will automatically handle the permission request if it was not previously requested. To enable remote notifications, use the following method from the Actito SDK:
do {
    let granted = try await Actito.shared.push().enableRemoteNotifications()
} catch {
    // Handle error
}
After enabling, the SDK will register the device for notifications with Actito.
You can check the user’s current enrollment and permission status using:
// Check if the user has previously enabled remote notifications.
Actito.shared.push().hasRemoteNotificationsEnabled

// Check if the device is allowed to receive remote notifications.
Actito.shared.push().allowedUI
These checks can help you update your app’s UI to reflect the user’s notification status or guide them to re-enable permissions if needed.
Disabling remote notifications
If the user chooses to stop receiving notifications, you can disable them programmatically:
do {
    try await Actito.shared.push().disableRemoteNotifications()
} catch {
    // Handle error
}
This action unregisters the device from receiving further remote notifications. It is recommended to provide a clear opt-out option in your app’s settings to comply with privacy and consent requirements.
Handling remote notifications
In order to handle all types of notifications, make sure your app is declaring the following permissions in your app's Info.plist file:

A notification can be opened by either tapping the actual notification or by tapping an action inside the notification. We will emit an event in each case to the ActitoPushDelegate.
extension AppDelegate: ActitoPushDelegate {
    // Handle notification opened
    func actito(_ actito: ActitoPush, didOpenNotification notification: ActitoNotification) {
        let controller: UIViewController = /* find your desired controller to present the UI in */

        // Using managed approach to display notification UI
        Actito.shared.pushUI().presentNotification(notification, in: controller)
    }

    // Handle notification action opened
    func actito(_ actito: ActitoPush, didOpenAction action: ActitoNotification.Action, for notification: ActitoNotification) {
        let controller: UIViewController = /* find your desired controller to present the UI in */

        // Using managed approach to display action UI
        Actito.shared.pushUI().presentAction(action, for: notification, in: controller)
    }
}
Managed vs. Manual handling
You can handle these notification events in one of two ways:
- Managed Approach (Recommended) — Include and use the
ActitoPushUIKitmodule to display notifications, actions, and track their engagement. This approach ensures consistency, proper event tracking, and integration with Actito. - Manual Approach — Implement your own notification presentation logic. This provides full control over the UI and behavior but requires handling all notification types, user interactions, and event reporting manually.
If you choose the manual approach, you are responsible for managing the full notification lifecycle, including engagement tracking required for analytics and reporting.
Displaying lock screen media
To display rich notifications — such as lock screen media or dynamically updated content — your app must include a Notification Service Extension (NSE). This extension allows the system to process incoming notifications before they are shown to the user, enabling Actito to attach images or other media to your messages.
You can find detailed setup instructions in the Notification Service Extension guide.