Getting Started
Using the Actito Ionic Native library will allow you to quickly implement remote notifications, use actionable analytics or display content in your app.
- An Actito app
- The latest version of Android Studio
- The latest version of Xcode
- Access to the Apple's Developer Portal
Understanding the environments
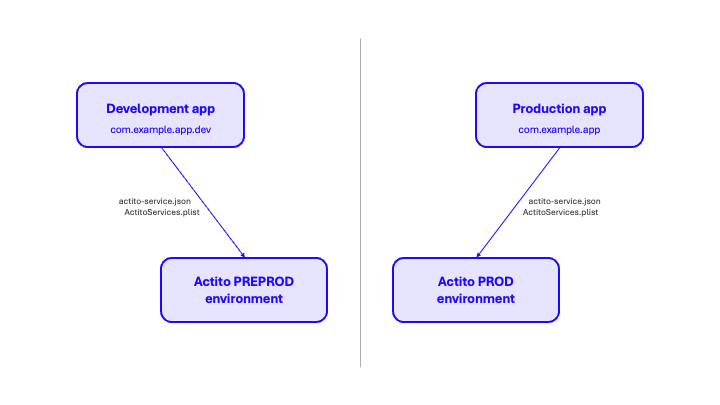
Applications commonly operate across two primary environments: development and production.
- The development environment is used for feature implementation, debugging, and internal testing.
- The production environment represents the live deployment accessed by end users.
It is strongly recommended to assign distinct bundle identifiers to each environment (for example, com.example.app.dev for development and com.example.app for production). Maintaining separate identifiers allows both versions to coexist on the same device, ensures each build connects to the appropriate Actito environment, and prevents data or configuration conflicts.
In most configurations:
- The development environment corresponds to the
debugbuild type. - The production environment corresponds to the
releasebuild type.
Establishing a clear separation between environments minimizes the risk of deploying builds that target incorrect services.
Please ensure you configure distinct environments, as this separation is required for remote notifications to function correctly.
An overview of the library
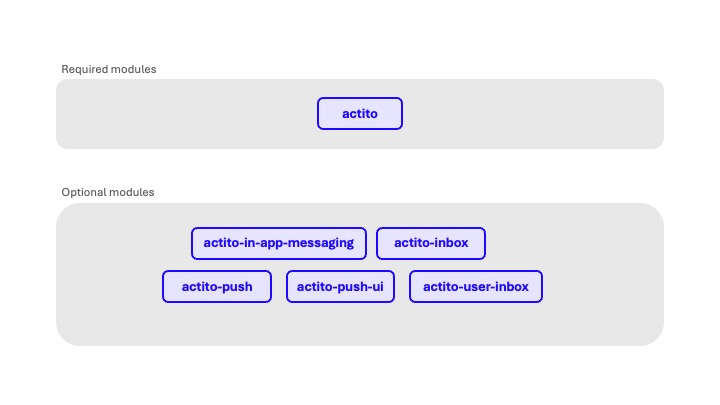
The Actito SDK is composed of multiple modules designed to integrate seamlessly with your application.
The core Actito module is required and provides the foundational functionality necessary for all Actito integrations.
Additional modules are optional and can be included as needed to extend the SDK's capabilities — for example, in-app messages or an inbox.
This modular structure allows developers to include only the components relevant to their use case, ensuring optimal performance and reduced application size. In the package.json your application, add the dependencies that you need:
# Required
npm i capacitor-actito

# Optional modules
npm i capacitor-actito-assets
npm i capacitor-actito-in-app-messaging
npm i capacitor-actito-inbox
npm i capacitor-actito-push
npm i capacitor-actito-push-ui
npm i capacitor-actito-user-inbox
Setting up the configuration file
To establish a connection between your application and Actito, you must download a configuration file for each environment your application supports. In most cases, this includes both development and production configurations.
- Android
- iOS
Once downloaded, place each file in the following locations within your project:
- Production configuration:
<project>/android/app/actito-services.json - Development configuration:
<project>/android/app/src/debug/actito-services.json
This approach uses Android's build configuration to determine which configuration file to use. You can read more about this approach in the Android documentation.
To make the values in your actito-services.json configuration file accessible to the Actito SDK, you need the Actito Services Gradle plugin (actito-services).
In your root-level (project-level) Gradle file (<project>/android/build.gradle), add the Actito Services plugin as a dependency:
buildscript {
    dependencies {
        classpath 'com.actito.gradle:actito-services:1.0.0'
    }
}
In your module (app-level) Gradle file (<project>/android/app/build.gradle), add the Actito Services plugin:
apply plugin: 'com.actito.gradle.actito-services'
Once downloaded, you have two options to include the file into your app target:
Place each file in the following locations within your project:
- Development configuration:
<project>/ios/<target>/Configurations/Debug/ActitoServices.plist - Production configuration:
<project>/ios/<target>/Configurations/Release/ActitoServices.plist
Now, in order to include the correct configuration file, we need to add build phase to your target.
Open the project, select the target and open Build Phases tab.
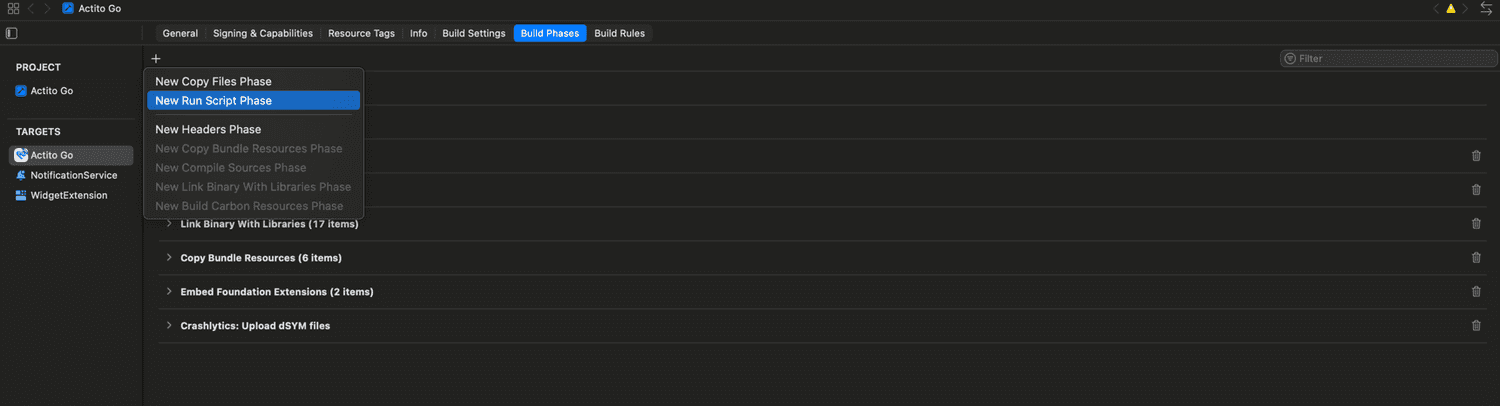
In the newly created build phase, add the following code:
# Name of the resource to copy
CONFIGURATION_FILE=ActitoServices.plist

# Get references to debug and release versions of the configuration file
DEBUG_CONFIGURATION_FILE=${PROJECT_DIR}/${TARGET_NAME}/Configurations/Debug/${CONFIGURATION_FILE}
RELEASE_CONFIGURATION_FILE=${PROJECT_DIR}/${TARGET_NAME}/Configurations/Release/${CONFIGURATION_FILE}

# Make sure the debug version exists
echo "Looking for ${CONFIGURATION_FILE} in ${DEBUG_CONFIGURATION_FILE}"
if [ ! -f "$DEBUG_CONFIGURATION_FILE" ] ; then
echo "File ${CONFIGURATION_FILE} (debug) not found."
exit 1
fi

# Make sure the release version exists
echo "Looking for ${CONFIGURATION_FILE} in ${RELEASE_CONFIGURATION_FILE}"
if [ ! -f "$RELEASE_CONFIGURATION_FILE" ] ; then
echo "File ${CONFIGURATION_FILE} (release) not found."
exit 1
fi

# Get a reference to the destination location for the plist file
PLIST_DESTINATION=${BUILT_PRODUCTS_DIR}/${PRODUCT_NAME}.app
echo "Copying ${CONFIGURATION_FILE} to final destination: ${PLIST_DESTINATION}"

# Copy the appropriate file to app bundle
if [ "${CONFIGURATION}" == "Debug" ] ; then
echo "File ${DEBUG_CONFIGURATION_FILE} copied"
cp "${DEBUG_CONFIGURATION_FILE}" "${PLIST_DESTINATION}"
else
echo "File ${RELEASE_CONFIGURATION_FILE} copied"
cp "${RELEASE_CONFIGURATION_FILE}" "${PLIST_DESTINATION}"
fi
The final result should look similar to the following example:
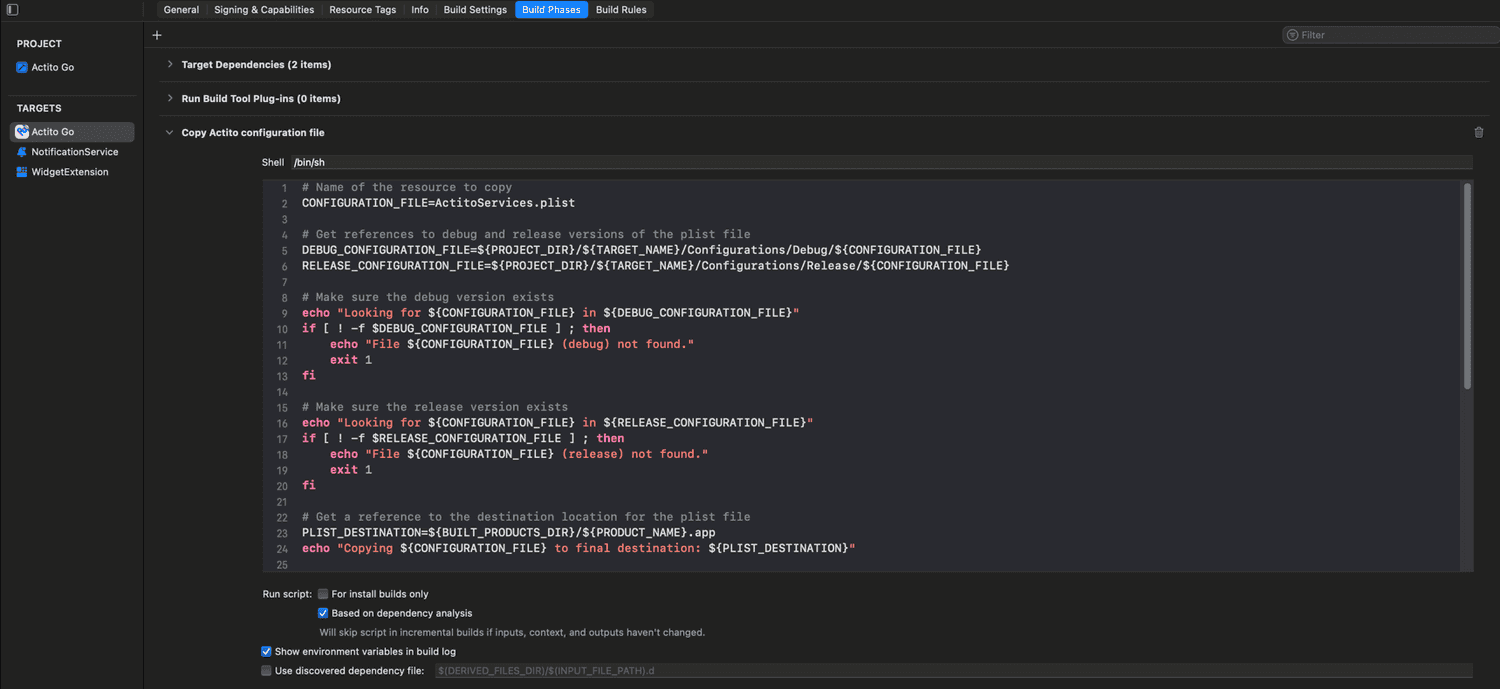
The example above is for a standard setup with 2 build configurations, Debug and Release. In case you have more configuration, make sure to adjust the script accordingly.
Manually
In Xcode, add the ActitoServices.plist file for your current environment to your app target. Be sure to replace this file with the one for the appropriate environment each time you switch configurations.
- Development configuration (running directly from Xcode): make sure to include configuration file pointing to Actito PREPROD environment
- Production configuration (Archive): make sure to include configuration file pointing to Actito PROD environment
Launching Actito
Before using any Actito features, the SDK must be initialized by invoking the Actito.LaunchAsync() method. This process ensures that the Actito SDK is fully set up and ready to operate. Most SDK functionality will remain unavailable until this initialization occurs.
It is recommended to invoke the launch within when the main application component initialises its state:
useEffect(() => {
  (async () => {
    // Launch Actito! 🚀
    await Actito.launch();
  })();
}, []);
Launching the SDK automatically registers the device with Actito. If your application requires user consent before collecting or registering device information, you may delay the initial launch until consent is granted.
Otherwise, ensure that launch() is called during the application's initialization phase to avoid missing important updates — particularly when the app is created in the background.
Unlaunching Actito
If your application needs to permanently disable Actito functionality, you can invoke the unlaunch() method. This method completely removes all Actito-related functionality and deletes any previously registered device information, both locally and remotely.
While this action is generally discouraged, it may be required in certain cases — such as when a user requests permanent account deletion or data removal — to ensure compliance with privacy and data protection regulations.
await Actito.unlaunch()
Once unlaunch() is invoked, all associated data is permanently destroyed and cannot be recovered. Any subsequent calls to Actito APIs will fail until the SDK is reinitialized using the launch() method.