Remote Notifications
In this article you'll learn how notifications are handled in your app and what are all the options at your disposal to create a great messaging experience for your users.
Notificare supports several types of interactive and actionable notifications that will be handled for you without any extra development. If you are going to prevent this default behaviour, please note that you will have to either handle all the functionality yourself (metrics logging, presenting UI or collect replies) or if you don't, you understand that some features will not work as advertised.
Requesting Permission
Since Android 13, the notification permission is not granted by default and should be requested. We recommended targeting Android 13 to have more control over the request.
When running Android 13 and targeting Android 12 or lower, users will be prompted for the permission when the notification channel is created. Typically, when the application starts.
Although permission requests must follow a recommended standard, controlling the overall experience is something unique to each application. However, you can use the following code as inspiration for your implementation.
async function requestNotificationsPermission() {
  try {
    if (await NotificarePush.shouldShowPermissionRationale()) {
      await NotificarePush.presentPermissionRationale({
        title: '...',
        message: '...',
        buttonText: '...',
      });
    }

    const status = await NotificarePush.requestPermission();
    if (status == PushPermissionStatus.GRANTED) {
      // Enable remote notifications
      return;
    }

    // Unlike the method NotificarePush.checkPermissionStatus(), both iOS and Android can return permanently denied.
    if (status == PushPermissionStatus.PERMANENTLY_DENIED) {
      // TODO: Show some informational UI, educating the user to change the permission via the Settings app.
      await NotificarePush.openAppSettings();
    }
  } catch (e) {
    // Handle error
  }
}
You can also check the status of the notifications permission at any time, as illustrated below.
async function checkNotificationsPermissionStatus() {
  try {
    const status = await NotificarePush.checkPermissionStatus();
    switch (status) {
      case PushPermissionStatus.GRANTED:
        // granted
        break;
      case PushPermissionStatus.DENIED:
        // denied
        break;
      case PushPermissionStatus.PERMANENTLY_DENIED: {
        // Permanently denied status can only be returned in iOS and Android 12 or lower.
        // Devices with Android 13 and up will return granted or denied.
        break;
      }
    }
  } catch (e) {
    // Handle error
  }
}
The examples above use the convenience methods available in the NotificarePush plugin to handle the bridge into native permission. You can use any other plugin or implement the bridge yourself. The focus of the examples is guiding you on the necessary permission and recommended upgrade path.
Enabling Notifications
In order to enable the device to receive notifications, all that you need to do is invoke a single method.
await NotificarePush.enableRemoteNotifications();
Typically, the step above is done during some form of user onboarding. When the user already went through that flow, we automatically enable notifications when Notificare launches.
You can also check whether the user enrolled on remote notifications.
await NotificarePush.hasRemoteNotificationsEnabled();
Additionally, you can check if the user has disabled notifications in the System Settings.
await NotificarePush.allowedUI();
Disabling remote notifications
Disabling remote notifications can be achieved in the same fashion as enabling them.
await NotificarePush.disableRemoteNotifications();
When this method is called, we will automatically register your device to never receive remote notifications, although you will still maintain the same user profile, inbox messages and enjoy all the other services your plan supports. You can at anytime request a re-register for push notifications if you wish to.
Receiving Notifications
Before you can start receiving push notifications, you will need to set up the native counterparts of your app.
- Android
- iOS
Due to the changes in Android 12 when it comes to handling notifications, your Activity needs to become the trampoline. Assuming you will let your MainActivity receive the notification intents, you need to declare the following intent-filter it in your AndroidManifest.xml.
<activity android:name=".MainActivity" android:launchMode="singleTask">
  <intent-filter>
    <action android:name="re.notifica.intent.action.RemoteMessageOpened" />

    <category android:name="android.intent.category.DEFAULT" />
  </intent-filter>
</activity>
You should configure the Activity receiving these intents with android:launchMode="singleTask" to prevent recreating it several times when processing the series of intents fired from opening a notification from the notifications drawer. You can also use android:launchMode="singleTop", but be aware the OS will recreate it when processing deep links triggered from the NotificationActivity. For more information on launch modes, refer to the Android documentation.
The plugin will automatically handle the intent and process the incoming notification.
Go to your app's target, click in the tab Capabilities and add both Push Notifications and Background Modes/Remote Notifications as shown below.

Authorization options
Our SDK allows you to define which notification's authorization options you would like to request from your user. This is an optional step, if not defined we will register UNAuthorizationOptions.alert, UNAuthorizationOptions.badge and UNAuthorizationOptions.sound by default. To define authorization options you can use the code below and customise as needed:
const availableOptions = [
  'alert',
  'badge',
  'sound',
  'carPlay',
  'providesAppNotificationSettings',
  'provisional',
  'criticalAlert',
  'announcement',
];

await NotificarePush.setAuthorizationOptions(availableOptions);
Also note that if you implement the UNAuthorizationOptions.providesAppNotificationSettings option, notifications from your app will display a button in both the Instant Tuning menu and Notification Settings. The purpose of that button is to provide users a shortcut to your app settings where they can fine-tune which kind of notifications they would like to receive. Implementing such settings views is highly recommended as it could be the reason between allowing your app to keep display notifications or being mute completely. If you do implement this option it is mandatory that you implement the following event:
NotificarePush.onShouldOpenNotificationSettings((notification) => {
  // Deep link to your settings view.
});
This will give you the opportunity to present your users with the in-app settings view where you should allow them to customize what kind of notifications they should receive. If the user clicked the button from a specific notification, you will receive that object too. When it comes from the Notification Settings, that object will be nil.
To know more about authorization options, please take a look at the native documentation.
Presentation options
Optionally, you can enable presentation options when your app is in the foreground. This will allow you to show a small banner on the top of your app, play a sound or badge your app, whenever a notification arrives, and your app is being used. By default, our library will set this to UNNotificationPresentationOptions = [], but you can change this behaviour to match your needs:
const availableOptions = [
  'alert',
  'badge',
  'sound',
  'banner',
  'list',
];

await NotificarePush.setPresentationOptions(availableOptions);
To know more about presentation options, please take a look at the native documentation.
Listening to Received Notifications
Once you're receiving notifications in your app, we can dive deeper and fully understand how they are handled. If you want to be notified incoming notifications, for example to add a badge to in your application, you can implement the following method.
NotificarePush.onNotificationInfoReceived((event) => {
  // more code ...
});
Presenting notifications
A notification can be opened by either tapping the actual notification or by tapping an action inside the notification. We will emit an event in each case.
NotificarePush.onNotificationOpened((notification) => {
  // more code ...
});

NotificarePush.onNotificationActionOpened((event) => {
  // more code ...
});
To handle the events above, you can take the managed approach and use our NotificarePushUI module which takes care of all the events and UI types as well as actions, or you can fully take over and present them however you prefer. However, be aware if you take the non-managed approach as you will have to deal with all aspects and types of presenting the notifications, including the events needed to show the user's engagement in our Dashboard.
For iOS, to handle all types of notifications, you need to make sure your app is declaring the following permissions in your app's Info.plist file:

This will make sure your app can request access to the device's camera or photo library whenever it is needed.
The code below illustrates how this works when using the managed approach.
NotificarePush.onNotificationOpened(async (notification) => {
  await NotificarePushUI.presentNotification(notification);
});

NotificarePush.onNotificationActionOpened(async (event) => {
  await NotificarePushUI.presentAction(event.notification, event.action);
});
Additionally, when using the managed approach, you can listen to Notification lifecycle events and perform any additional steps you may require. You can listen to the following events as needed.
NotificarePushUI.onNotificationWillPresent((notification) => {
  // more code ...
});

NotificarePushUI.onNotificationPresented((notification) => {
  // more code ...
});

NotificarePushUI.onNotificationFinishedPresenting((notification) => {
  // more code ...
});

NotificarePushUI.onNotificationFailedToPresent((notification) => {
  // more code ...
});

NotificarePushUI.onNotificationUrlClicked((event) => {
  // more code ...
});

NotificarePushUI.onActionWillExecute((event) => {
  // more code ...
});

NotificarePushUI.onActionExecuted((event) => {
  // more code ...
});

NotificarePushUI.onActionNotExecuted((event) => {
  // more code ...
});

NotificarePushUI.onActionFailedToExecute((event) => {
  // more code ...
});

NotificarePushUI.onCustomActionReceived((event) => {
  // more code ...
});
For iOS, if you are considering supporting non-HTTPS pages when using the Webpage notification type you will need to also declare a more permissive ATS policy as follows:
Deep Links
In modern apps, this is a great way of creating interactions between notifications, and your own app content, allowing you to send messages that can eventually drive the user to open content hidden deeper in your app.
You can take a look at the official React Native deep linking guide for more information on the subject should you want to use the standard module. However, to ease the process, we included a simple Notificare.onUrlOpened event that requires minimal work.
To prepare your app to handle deep links is not complicated and will allow you to handle not only Deep Link notification types, but also any link made from a web page. In order to indicate your app that you will handle a custom URL scheme you simply have to configure the native part of your app to accept said URL schemes.
- Android
- iOS
Declare the following in the AndroidManifest.xml and be sure to update the scheme to match yours:
<activity android:name=".MainActivity">
  <intent-filter>
    <action android:name="android.intent.action.VIEW" />
    <category android:name="android.intent.category.DEFAULT" />
    <category android:name="android.intent.category.BROWSABLE" />
    <data android:scheme="com.example" />
  </intent-filter>
</activity>
If you are planning to handle Dynamic Links, you must also add all the domain prefixes you've created:
<activity android:name=".MainActivity">
  <intent-filter android:autoVerify="true">
    <action android:name="android.intent.action.VIEW" />
    <category android:name="android.intent.category.DEFAULT" />
    <category android:name="android.intent.category.BROWSABLE" />
    <data android:host="example.ntc.re" android:scheme="https" />
  </intent-filter>
</activity>
If you need to open external deep links in your notifications, you need to add the appropriate entries to your AndroidManifest.xml for those links to work in Android 11, for example to handle HTTP and HTTPS links, you would need to add:
<queries>
  <intent>
    <action android:name="android.intent.action.VIEW" />
    <category android:name="android.intent.category.BROWSABLE" />
    <data android:scheme="https" />
  </intent>
  <intent>
    <action android:name="android.intent.action.VIEW" />
    <category android:name="android.intent.category.BROWSABLE" />
    <data android:scheme="http" />
  </intent>
</queries>
Declare the following in your Info.plist and be sure to update the properties to match yours:
If you are planning to handle Dynamic Links, you must also add all the domain prefixes you've created:
You can also add support for deferred links. This type of dynamic link survives the App Store installation process and can be handled the first time the application is opened. Since this is an opt-in feature, you have to make changes to your application as described below. Once the deferred link is evaluated, Notificare will open the resolved deep link.
Notificare.onReady(async (application) => {
  try {
    if (!(await Notificare.canEvaluateDeferredLink())) {
      return;
    }

    const evaluated = await Notificare.evaluateDeferredLink();
    // The deferred link was successfully handled.
  } catch (e) {
    // Something went wrong.
  }

  // more code ...
});
When the user taps on a deep link, your application will be executed and the Notificare.onUrlOpened event will be called.
Notificare.onUrlOpened((url) => {
  // process the deep link
});
Another common example where you will make use of deep links, would be to take proper action whenever users click in hypertext links in a Notificare's HTML or Web Page notification type. This is done by first declaring all the URL schemes that you want to handle.
- Android
- iOS
In your AndroidManifest.xml:
<meta-data
  android:name="re.notifica.push.ui.notification_url_schemes"
  android:resource="@array/notification_url_schemes" />
This entry will require you to create a android/app/res/values/notification_url_schemes.xml file with the following content:
<?xml version="1.0" encoding="utf-8"?>
<resources>
  <string-array name="notification_url_schemes">
    <item>com.example</item>
    <item>com.example2</item>
    <item>com.example3</item>
  </string-array>
</resources>
In your NotificareOptions.plist:
<plist version="1.0">
  <dict>
    <key>URL_SCHEMES</key>
    <array>
      <string>com.example</string>
      <string>com.example2</string>
      <string>com.example3</string>
    </array>
  </dict>
</plist>
Any click in an HTML or Web Page notification type, would be intercepted by our library and trigger the event NotificarePushUI.onNotificationUrlClicked.
Notification Service Extension
In iOS 10, Apple introduced a new extension that enables your apps to process notifications before they are displayed to the users. This can be used to provide users with rich content in the lock screen or simply change the content of your messages in the client side of things.
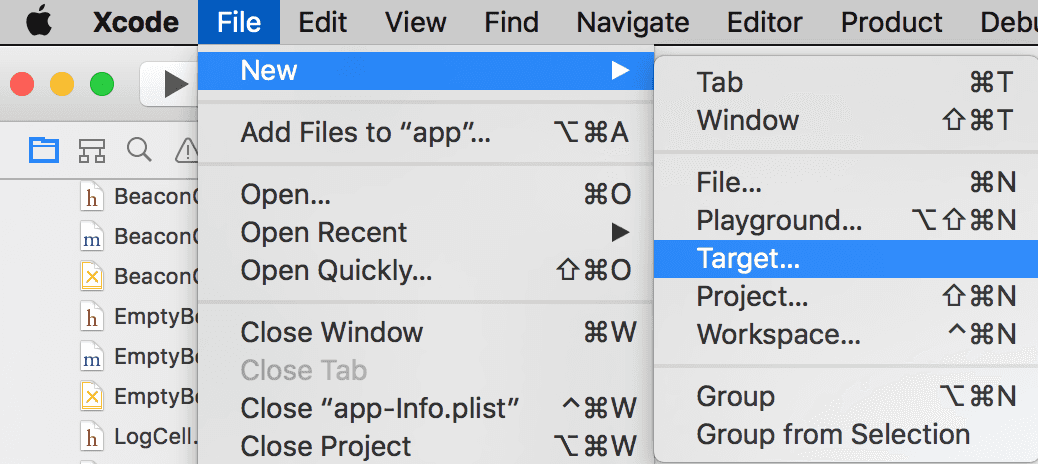
To make use of this new feature you need to add a new target to your application:

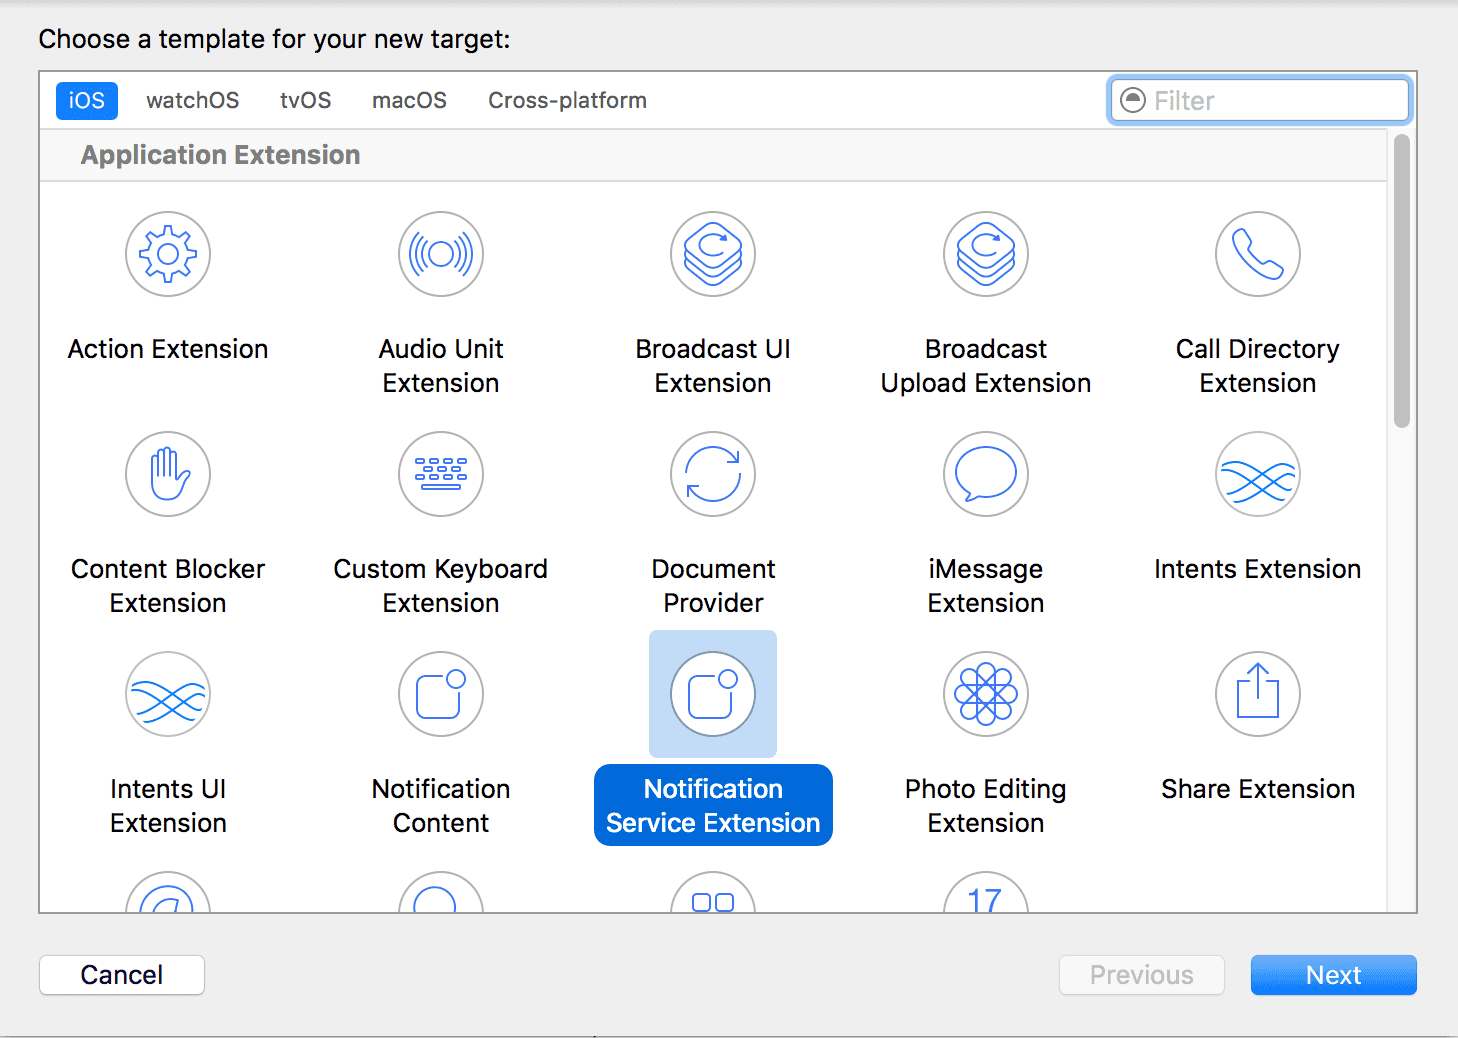
This will prompt you to the extensions window where you should pick the Notification Service Extension:

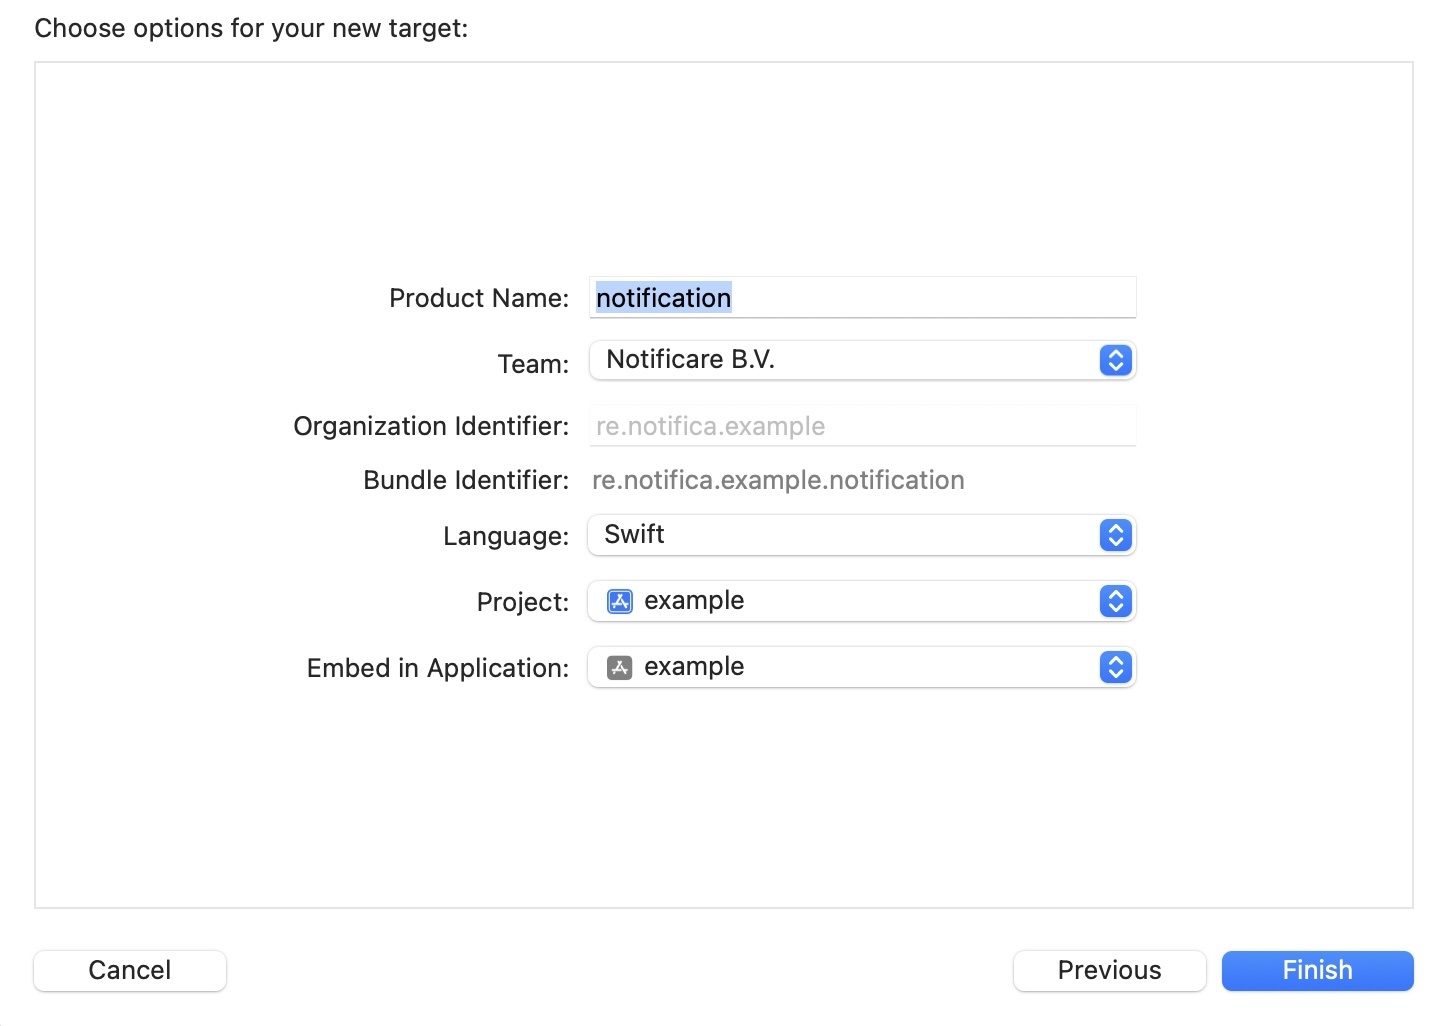
To complete adding the new target you must provide a product name and click finish:

This is going to add a new folder to your project with the new extension files.
With the package manager of your choice, add the NotificareNotificationServiceExtensionKit dependency to your app and proceed to implement it.
Please note that this extension is a different target and has its own Info.plist. This means that after iOS 9, Apple will not load non-secure content by default. To make it possible for apps to load content served over HTTP you will need to add a new entry in the extension Info.plist. If you're only going to our dashboard to create lock screen images then this step is not necessary.
If you are using our API to send lock screen media images that are hosted in another location and served over a non-secure protocol (http://) then declare the following in your extension's Info.plist:
In your newly created implementation file, in the didReceive method, you must add the following in order to display whatever you end as the lock screen media of your messages:
override func didReceive(_ request: UNNotificationRequest, withContentHandler contentHandler: @escaping (UNNotificationContent) -> Void) {
    NotificareNotificationServiceExtension.handleNotificationRequest(request) { result in
        switch result {
        case let .success(content):
            contentHandler(content)

        case let .failure(error):
            print("Failed to handle the notification request.\n\(error)")
            contentHandler(request.content)
        }
    }
}
Once your app implementation is complete you can send images via our dashboard by uploading an image in the Lock Screen Media field of the message composer or by using the property attachments of the notification payload of the REST API.
Notifications from Unknown Sources
In some apps it is possible you're also using other providers to send remote notifications, when that is the case Notificare will recognize an unknown notification and trigger an event that you can use to further handle that notification. To be notified whenever that happens, implement the following events.
NotificarePush.onUnknownNotificationReceived((notification) => {
  // more code ...
});

NotificarePush.onUnknownNotificationOpened((notification) => {
  // more code ...
});

NotificarePush.onUnknownNotificationActionOpened((data) => {
  // more code ...
});